BG3: The Ultimate Bardadin Build for Insane Damage
Master BG3 with this Swords Bard, Paladin & Sorcerer multiclass. Unleash huge Divine Smites and ace every skill check. Full leveling and gear guide
This build's final class composition is 6 College of Swords Bard / 4 Sorcerer (any subclass) / 2 Paladin (any subclass). Here's the breakdown of what each class contributes:
- Bard: Provides Extra Attack, high-level spell slots, supplemental damage and utility through Slashing Flourish, and incredible versatility for skill checks.
- Sorcerer: Grants access to Booming Blade, Shadow Blade, Metamagic, more spell slots, and the ability to convert Potions of Angelic Reprieve (short rests) into Sorcery Points and spell slots. Each potion can be converted into 10 Sorcery Points or up to a 7th-level Divine Smite slot.
- Paladin: Offers proficiency with Medium Armor (or Heavy Armor if you start as Paladin), Shields, and Martial Weapons, plus the ability to convert spell slots into massive burst damage with Divine Smite.
Pros and Cons
Advantages:
- The Ultimate "Face" of the Party: As a Charisma-based character, this build excels in social situations while also handling lockpicking and other skill checks with ease, thanks to the Bard's versatile toolkit. Slashing Flourish adds both damage and battlefield control.
- Comprehensive Spell List: The combined Bard and Sorcerer spell lists cover nearly all essential low-level utility spells, including every ritual spell except Find Familiar. You also get crucial combat spells like Shield and Misty Step.
- Self-Sufficient and Team-Friendly: The build's core damage comes from the self-generated Shadow Blade, which also grants you Advantage on attacks in dim light or darkness. It doesn't compete with teammates for weapons, and the aura from the Resonance Stone, a key item, benefits the whole party.
Disadvantages:
- High-Level Slots, Low-Level Spells: You will have spell slots up to 6th level, but the highest-level spells you can actually learn are 3rd-level spells from the Bard list. (This is fine, as 1st-4th level slots are for Divine Smite, 5th level is for upcasting Shadow Blade and converting to Sorcery Points, and the 6th level slot can be used for a 30 temp HP Armour of Agathys).
- Slower Start: Before Act 2, this build functions primarily as a Bard. Compared to a pure Swords Bard, you'll miss out on Counterspell and Action Surge, resulting in lower first-turn burst potential.
- Item Dependent: The build's high damage relies heavily on the large damage dice of Shadow Blade and the psychic vulnerability created by the Resonance Stone. Without these, your damage will suffer. Furthermore, the Resonance Stone also makes your party vulnerable to psychic damage and gives disadvantage on mental saves, so you must be careful not to get wiped out.
Leveling Progression and Spell Choices
Character Creation:
- Race: Human or Half-Elf are recommended. Since you won't multiclass into Paladin until late, the Civil Militia proficiency from these races grants you shield proficiency from the start, which the Swords Bard lacks. The +2 AC from a shield is a huge help early on.
- Alternative Races: Wood Elf / Half Wood-Elf provides extra movement speed, which is always useful for a melee character. Half-Orc is also a strong choice for the extra critical damage die.
Starting Stats & Early Game (Levels 1-6):
The early game progression is identical to a standard Swords Bard.
- Stats: 8 Str / 16 Dex / 14 Con / 8 Int / 12 Wis / 16 Cha.
- Skills: Choose three from Sleight of Hand, Insight, Perception, and Persuasion.
- Cantrips: Minor Illusion, Friends.
- Spells: Select ritual spells like Longstrider, Feather Fall, and Speak with Animals based on your party's needs. For combat, pick from Thunderwave (AoE + knockback), Healing Word (bonus action ranged heal), Faerie Fire (AoE advantage), or Tasha's Hideous Laughter (single-target lockdown). My preferred Level 1 spell list is: Longstrider, Feather Fall, Thunderwave, Healing Word, Dissonant Whispers.
- Level 3 (Swords Bard): Gain Medium Armor proficiency. Specialize your skills in Sleight of Hand and Persuasion. For your Fighting Style, choose Two-Weapon Fighting if dual-wielding (hand crossbows or melee), otherwise, pick Dueling. For your 2nd-level spell, Cloud of Daggers is a reliable AoE. You might also swap Dissonant Whispers for Hold Person.
- Level 4 (Feat): Take Alert to ensure you go first in combat. For the extra cantrip, grab Mage Hand or Light.
- Level 5: Bardic Inspiration die increases to a d8 and now recharges on a short rest. You also gain 3rd-level spells.
- Level 6: You get Extra Attack and another 3rd-level spell.
- Early game AC with generic medium armor (14), Dexterity bonus (+2), and a shield (+2) will be 18, which is sufficient for Act 1.
Mid Game (Levels 7-10):
After clearing the Githyanki Crèche and entering Act 2, you should be around Level 7. Now is a good time to respec.
- Equip the Gloves of Dexterity (sets Dex to 18). New stats: 12 Str / 8 Dex / 16 Con / 8 Int / 14 Wis / 16 Cha.
- Level 7 (Respec): Start with 1 Sorcerer / 6 Bard. Starting as a Sorcerer gives you Constitution save proficiency. Shadow Magic is great for survivability, while Draconic (White) gives you Armour of Agathys. Your Sorcerer spell should be Shield.
- Level 8 (2 Sorcerer / 6 Bard): Gain Metamagic (Twinned Spell and Extended Spell).
- Level 9 (3 Sorcerer / 6 Bard): Gain access to 2nd-level Sorcerer spells and Quicken Spell. Take Shadow Blade.
- Level 10 (4 Sorcerer / 6 Bard): Learn Misty Step. For your second feat, take Savage Attacker.
Endgame (Levels 11-12):
After using the Mirror of Loss in Act 3 and acquiring your final gear, respec one last time.
- Final Stats: 8 Str / 16 Dex / 14 Con / 8 Int / 10 Wis / 17 Cha (+3 from the Mirror for 20 Cha).
- Level 11 (6 Bard / 4 Sorcerer / 1 Paladin): Add Paladin. Oath of Vengeance is a good choice. You gain all armor, shield, and weapon proficiencies.
- Level 12 (6 Bard / 4 Sorcerer / 2 Paladin): You can now use Divine Smite. For your Fighting Style, take Dueling if you haven't already. If you have, take Defence.
Equipment Guide
Act 1:
- Gear: Before level 3, use Mage Armour for protection (16 AC). Wield a finesse weapon + shield or dual-wield. Use a light crossbow, then switch to dual hand crossbows at level 3 if you took the Two-Weapon Fighting style.
- Helmet: Haste Helm
- Armor: Githyanki Half Plate (15 AC), Adamantine Scale Mail (16 AC, crit immunity).
- Gloves: Gloves of Archery, Gloves of Power (if branded).
- Boots: Boots of Speed (Bonus Action Dash).
- Amulet: Amulet of Misty Step.
- Rings: Ring of Protection (+1 AC/Saves).
- Melee: Phalar Aluve (Finesse), Adamantine Shield (+2 AC), Watcher's Shield (+2 AC).
- Ranged: Titanstring Bow (if you use Strength elixirs), Hand Crossbows.
- Elixir: Elixir of Hill Giant Strength (21 Str).
Crèche & Act 2:
Your priority should be getting the Gloves of Dexterity from the Githyanki Crèche. In Act 2, rescue the Tieflings from Moonrise Towers as soon as possible to get the Potent Robe.
- Helmet: Diadem of Arcane Synergy (Add Charisma to weapon damage).
- Cloak: Cloak of Protection (+1 AC/Saves).
- Armor: Potent Robe (Add Charisma to cantrip damage), Yuan-Ti Scale Mail (Full Dex bonus to AC).
- Gloves: Gloves of Dexterity (sets Dex to 18).
- Boots: Evasive Shoes (+1 AC).
- Amulet: Harper Amulet (Advantage on Wisdom saves, helps counter Resonance Stone).
- Rings: Risky Ring (Advantage on attacks), Ring of Strange Conduit (+1d4 Psychic damage while concentrating).
- Melee: Shadow Blade (cast at 5th level), Ketheric's Shield (+3 Initiative).
- Key Item: Resonance Stone (creates Psychic vulnerability aura).
- Consumable: Potion of Angelic Reprieve (Short rest, converts to Sorcery Points).
Act 3 Endgame Gear:
Respec to start as a Paladin to gain Heavy Armor proficiency.
- Helmet: Helm of Balduran (+2 Initiative, +2 Attack Rolls).
- Cloak: Any.
- Armor: Armour of Agility (17 AC, full Dex bonus), Helldusk Armour (21 AC, damage reduction).
- Gloves: Legacy of the Masters (+2 Attack/Damage), Helldusk Gloves (+1 to all attacks, +1d6 fire damage).
- Boots: Any.
- Amulet: Fey Semblance Amulet (Advantage on Int, Wis, Cha saves, counters Resonance Stone).
- Rings: Any.
- Melee: Nyrulna (if crit-focused), Viconia's Walking Fortress (+3 AC, best shield).
- Ranged: The Dead Shot (Crit range -1).
- Elixir: Elixir of Cloud Giant Strength (27 Str).
Final Build Stats & Gear Example
- Classes: 6 Swords Bard / 4 Sorcerer / 2 Paladin (Start as Paladin for proficiencies).
- Starting Stats: 8 Str / 16 Dex / 14 Con / 8 Int / 10 Wis / 17 Cha.
- Bonuses: Elixir of Cloud Giant Strength (27 Str), Mirror of Loss (+3 Cha).
- Final Stats: 27 Str / 16 Dex / 14 Con / 8 Int / 10 Wis / 20 Cha.
- Feats: Alert, Savage Attacker. (If you get initiative from gear, consider Sentinel).
Recommended Gear Combination:
- Helmet: Diadem of Arcane Synergy
- Cloak: Cloak of Protection
- Armor: Potent Robe
- Gloves: Legacy of the Masters
- Boots: Any of your choice.
- Amulet: Fey Semblance Amulet
- Ring 1: Risky Ring
- Ring 2: Ring of Strange Conduit
- Melee: Shadow Blade (5th-level version is 4d8 Psychic damage)
- Shield: Viconia's Walking Fortress
- Ranged: The Dead Shot
Damage Output:
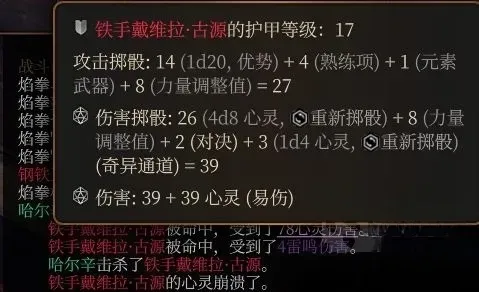
This screenshot shows a basic attack's damage without Arcane Synergy or Booming Blade active. In practice, your combo is Booming Blade + Slashing/Defensive Flourish + Quickened Metamagic Booming Blade.

AC Stacking:
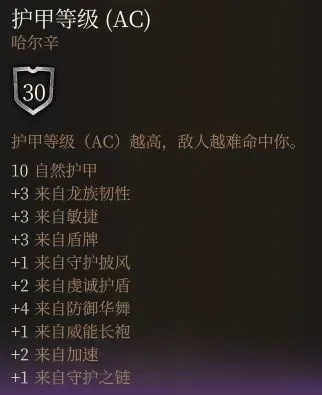
By using a Flourish instead of a standard attack and concentrating on a spell like Shield of Faith (to trigger the Ring of Strange Conduit), you can stack your AC incredibly high. This is before even using the Shield spell for an additional +5 AC.

